This is the second post in a row of several ones dealing with DietPi’s WiFi functionality.
It describes the option of a gateway from a WiFi area to a (local) LAN.
The WiFi HotSpot of DietPi gives an easy to use subordinated WiFi subnet routet to a superimposed Ethernet LAN. Sometimes an inverse functionality is needed: Connecting to an upper WiFi and set up a local LAN area to connect Ethernet cable based systems (e.g. older PCs or devices without WiFi).
This blog post is one of a series regarding setup and usage of WiFi subjects:
- DietPi’s WiFi – Part 1: Combining the WiFi HotSpot with an Ad blocker
- DietPi’s WiFi – Part 2: WiFi-to-LAN gateway
- DietPi’s WiFi: Extend network with Bridging – Part 3 (t.b.d.)
Table of contents
- Introduction
- Installation and setup
- 2.1 Prerequisites
- 2.2 Setup WiFi area
- 2.3 Setup LAN area
- 2.4 Setup DHCP server
- 2.5 Setup routing
- 2.6 Reboot the final system
- Diagnosis
- References
Table of contents
1. Introduction
Possible use cases, which shall be covered by this WiFi-to-LAN gateway, are:
- Connect a legacy device (e.g. a plotter without WiFi) to an installation which is completely wireless
- Have a migration step option during a switchover from cable-based to wireless environments
- Extend the DHCP IP address range if your existing router is not able to achieve this
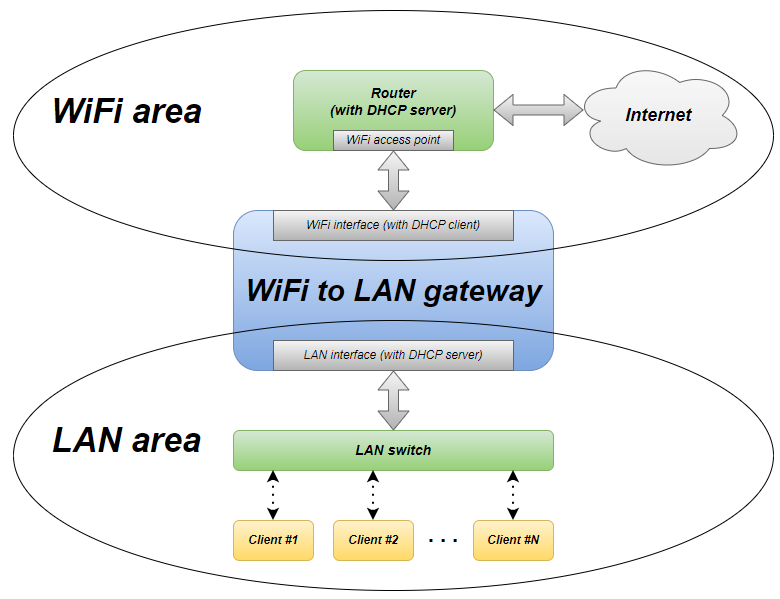
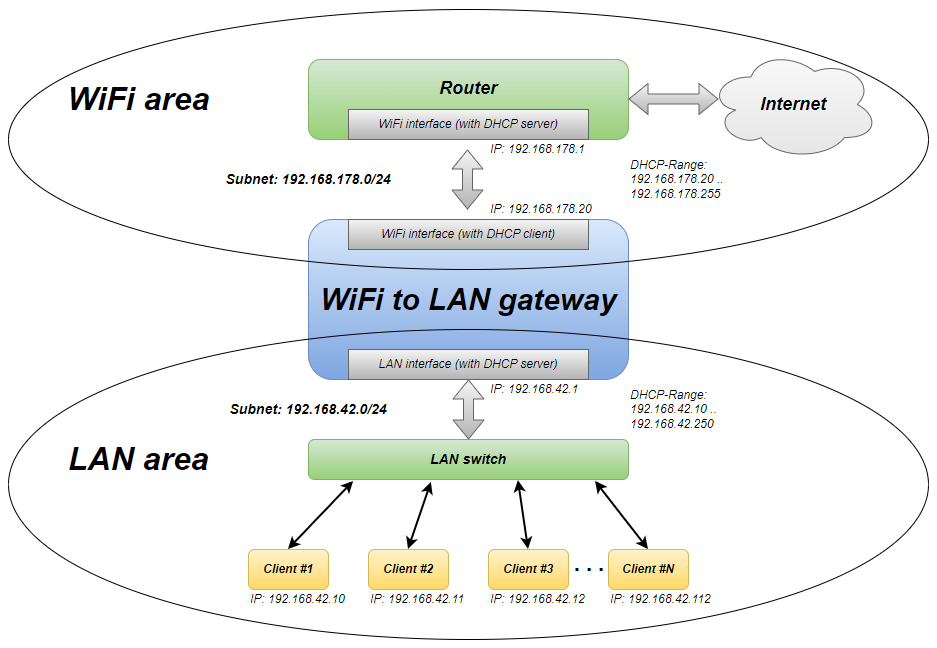
An exemplary system structure which is used in the installation instructions below is shown in the following graphic. It shows a LAN area with the subnet 192.168.42.0 .. 192.168.42.255 with an DHCP range of 192.168.42.10 .. 192.168.42.250.
The superimposed network has the subnet 192.168.178.0 .. 192.168.178.255.
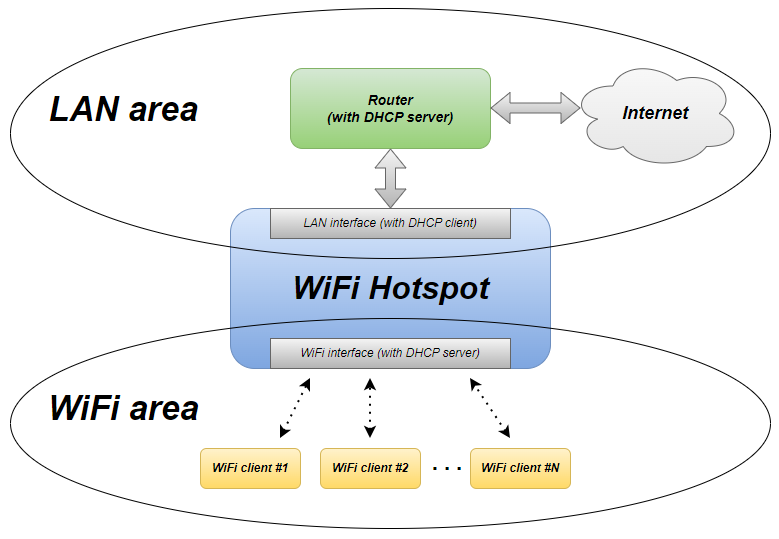
The structure look similar to the DietPi WiFi HotSpot option (see graphics below), described in the part 1 of this blog post series.
The main technical differences are:
- “Inverted” networks, i.e. superimposed network is wireless compared to the WiFi HotSpot where it is cable based. Similarly, the underlying network logic is also inverted
- Wifi-to-LAN gateway: No wireless access point (i.e. no
hostapdsoftware package) is running - WiFi HotSpot: The WiFi connection to the superimposed network is based von
wpa_supplicant
2. Installation and setup
2.1 Prerequisites
The start of this description is a DietPi base installation without any special networking package like, WiFi HotSpot, Tor HotSpot, HAProxy and frp. These packages compete with the described WiFi-to-LAN gateway and cannot reside in parallel.
Additionally, packages like Pi-hole, Unbound and AdGuard Home need further setups (which is somehow addressed below).
VPN packages installed in parallel were not investigated, so it is not known how they reside.
The installation is structured into the following described steps to be executed consecutively.
At the point of start, a LAN based connection to a superimposed network is assumed.
Also the execution of the listed commands as root user is assumed. Otherwise, a sudo can be used as the prefix for all commands.
2.2 Setup WiFi area
In this step the WiFi is activated and the DietPi system is connected to the superimposed WiFi network. If the DietPi system is already connected to this WiFi network (instead of a LAN based connection), this step can be omitted.
To bring the system to the superimposed wireless network, the following steps are conducted:
- Achieve an active WiFi. This can be done by activating an onboard WiFi via
dietpi-configinNetwork Options: Adaptersor by having a WiFi hardware running like an USB stick WiFi adapter.
Remark: If an onboard WiFi is activated, a reboot of the system is required once. - Connect to the WiFi: By selecting the SSID and entering the WiFi credentials (also via
dietpi-configinNetwork Options: Adapters), the WiFi connection is established. - The next step is to power off the system via
poweroff - The LAN cable from the superimposed network has to be connected now (typically, a connection to a different Ethernet switch is needed, otherwise later on there would be conflicting DHCP servers on the Ethernet).
- The next step is to switch on the system. It should connect to the WiFi so that the DietPi system is accessible from the superimposed WiFi network. After logging into the DietPi system, the WiFi connection can be verified in the banner (if configured, a wlan0 entry should be visible) or via
dietpi-configinNetwork Options: Adapters. Alsoip a show dev wlan0should give a diagnosis.
2.3 Setup LAN area
Change LAN to static address -> reboot
In this step the LAN area is configured to have a static IP address for the subordinated LAN network.
It can be done via dietpi-config or by editing the file /etc/network/interfaces by hand:
nano /etc/network/interfacesThe section for the LAN (typ. eth0 has to be edited. In the example, a subnet 192.168.42.0/24 is used:
# Ethernet
allow-hotplug eth0
iface eth0 inet static
address 192.168.42.1
netmask 255.255.255.0
Remark: Entries for gateway and dns-nameservers typically present in the section are defined later with the DHCP server settings.
The correct setup of this step can be checked via dietpi-config:
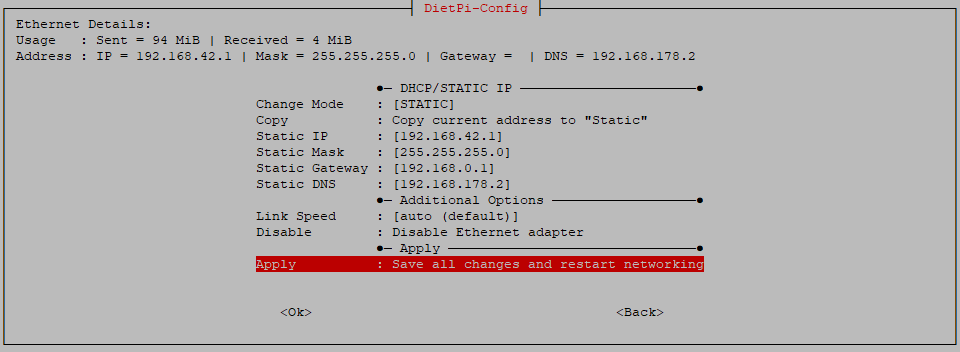
Finally, a reboot should be done to activate the static IP settings of the LAN.
2.4 Setup DHCP server
In this step, the DHCP server isc-dhcp-server package is installed and configured. The DHCP server organizes the IP addresses in the LAN area.
The server is installed via
apt install -y isc-dhcp-serverNext, the DHCP configuration is set within the file /etc/dhcp/dhcpd.conf via
cat << '_EOF_' > /etc/dhcp/dhcpd.conf
authoritative;
#default-lease-time 43200;
#max-lease-time 86400;

subnet 192.168.42.0 netmask 255.255.255.0 {
        range 192.168.42.10 192.168.42.250;
        option broadcast-address 192.168.42.255;
        option routers 192.168.42.1;
        option domain-name "local";
        option domain-name-servers 9.9.9.9, 149.112.112.112;
}
_EOF_
This sets the DHCP IP address range to 192.168.42.10 .. 192.168.42.250.
In the case that a different nameserver is used (like in a Pi-hole or AdGuard Home environment), its address has to be entered in the option domain-name-servers entry like e.g.
option domain-name-servers 192.168.178.2;As a next step, the DHCP server is bound to the LAN interface (eth0) via
echo "INTERFACESv4=\"eth0\"" > /etc/default/isc-dhcp-server2.5 Setup routing
In this step, the IP routing is installed and configured. The routing enables the access to the internet from the LAN area.
The routing is installed via
apt install -y iptablesNext, the routing table has to be setup via
iptables -t nat -A POSTROUTING -s 192.168.42.0/24 -o wlan0 -j MASQUERADE
iptables -A FORWARD -i wlan0 -o eth0 -m state --state RELATED,ESTABLISHED -j ACCEPT
iptables -A FORWARD -i eth0 -o wlan0 -j ACCEPT
ip6tables -t nat -A POSTROUTING -o wlan0 -j MASQUERADE
ip6tables -A FORWARD -i wlan0 -o eth0 -m state --state RELATED,ESTABLISHED -j ACCEPT
ip6tables -A FORWARD -i eth0 -o wlan0 -j ACCEPT

iptables-save > /etc/iptables.ipv4.nat
ip6tables-save > /etc/iptables.ipv6.nat
This generates the iptables files in /etc/iptables.ipv4.nat resp. /etc/iptables.ipv6.nat which are loaded at system start. This load procedure is activated by appending the iptables-restore information in the file /etc/network/interfaces via
cat << _EOF_ >> /etc/network/interfaces

# iptables NAT rules
up iptables-restore < /etc/iptables.ipv4.nat
up ip6tables-restore < /etc/iptables.ipv6.nat
_EOF_
At last, the routing is activated via
echo -e 'net.ipv4.ip_forward=1\nnet.ipv6.conf.default.accept_ra=2\nnet.ipv6.conf.all.accept_ra=2\nnet.ipv6.conf.default.forwarding=1\nnet.ipv6.conf.all.forwarding=1' > "/etc/sysctl.d/dietpi-routing.conf"
sysctl net.ipv4.ip_forward=1 net.ipv6.conf.default.accept_ra=2 net.ipv6.conf.all.accept_ra=2 net.ipv6.conf.default.forwarding=1 net.ipv6.conf.all.forwarding=1
2.6 Reboot the final system
In this final step, all components like routing, DHCP server etc. are activated by rebooting the system:
rebootNow, the LAN connection of the DietPi system can be connected e.g. to a LAN switch like shown in the graphics above and the routing from the LAN to the internet should work.
3. Diagnosis
Diagnosis of the system can be done with the following commands and configuration files. A description of them is not part of this blog post, it can be found in the internet.
3.1 CLI commands
The following commands might help to diagnose the system:
ip a ip netconfip route, pingIn the LAN area, the internet connectivity can be checked via the ping command:
ping dietpi.com3.2 Check configuration files
The following configuration files can be examined (e.g. via cat):
cat /etc/network/interfacescat /etc/dhcp/dhcpd.confcat /etc/iptables.ipv4.natcat /etc/default/isc-dhcp-servercat /etc/sysctl.d/dietpi-routing.conf


